Topics Map > Cobra Learning
Cobra Learning - Virtual Classroom (Bongo)

Virtual Classroom (Bongo)
You can schedule a synchronous meeting with an individual student or multiple students in your course. Maximum webcams allowed to share is 7, but as many as 50 students can participate (without webcams) in the meeting. You can meet for office hours or to discuss a paper or a project. Documents can be uploaded and viewed during the meeting.
Setting up Virtual Classroom in Your Course
Click on the Virtual Classroom link in the navbar. (See Creating and Managing Navbars to add the Virtual Classroom link.)
When Virtual Classroom opens, you'll start at the meeting list/menu. To schedule a new meeting, click the plus (+) sign in the lower right corner.
 >
>Enter the name the meeting and the date and time of the meeting.

Use a name that easily identify the purpose, like "Office Hours" or "Guest Speaker."

Click on the date option and it will bring up a calendar.

You can select your date and move forward or backward like any web-based calendar. Then click OK when you have your date selected.
Note:: if you need to select multiple dates, the recurring option will help, so select the first day that this meeting room will start.

Click on the time option to bring up the clock.

The clock will default to the current time, if you click on the hour in the left pane, it will allow you to move the hand on the clock to set the hour; then click on the minutes in the left pane to set the time. Be sure to select AM or PM. Then click OK.

If you need to set a meeting up in a hurry, you can simply click the "Now" option to bypass the date and time selections and it will open the room immediately upon creation.

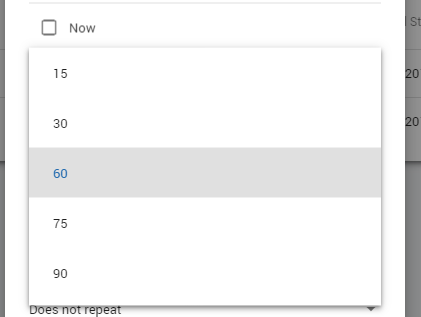
Next, choose the length of the meeting, by clicking the Max Duration option. The default time will be 60 minutes.

Your meeting duration options are 15 minutes, 30 minutes, or 60 minutes. NOTE: 75 and 90 minutes are no longer an option (effective 4/2020).
The next options will ask if you want the meeting recorded automatically, if you want the link to the recording to post after it's completed, and if external participants (like a guest speaker) are allowed to join the meeting. If the entire class is invited to enter this room when it's open, then leave this box checked as well.
Note:: if you need to meet with individual students in private, then you would uncheck this box and add the individual students later.


If you need to schedule recurring meetings, such as Office Hours, then use above settings to create the first "day" of your scheduled meetings. For example, if you have office hours on Tuesdays and Thursdays at 10 am, then set the first meeting up for Tuesday at 10 on the first week that the meetings start. Then select the recurring option for Tuesday. Then set another meeting time for the Thursday dates.

Your options range from 1 week to 15 weeks. A link for each meeting will be generated and automatically added as an event to the calendar.
Once you have the meeting set up, click Save.

If you unchecked Invite Entire Class to create a private meeting room, then you will click on the vertical ellipsis next to the scheduled meeting date. This will open a menu where you can launch the meeting, edit the meeting or delete/cancel the meeting. But to invite/add individual participants, you'll select the Manage Invites settings link.

You may need to click Sync Roster to ensure all students are listed in the Available column. Then, click the student(s) that need to be added and they will populate the Invited column. If you select an incorrect invitee, simply click on their name in the invited column to remove them. Then click Save to close the window.

Once your meetings are set, your Active Meetings page will list all of the scheduled meetings with dates and times. You can sort this list in ascending or descending order of date.

Each meeting has a vertical ellipsis action menu, as shown previously. If you selected to allow external participants, you'll see the option in the menu: Copy External Link. This grabs the URL easily for you to paste into an email invite or post to a website or course without having to launch the lobby page to grab the URL.

When you click Launch from the menu, it will open the meeting lobby page. The meeting lobby page contains the name of the moderator (room creator), the invite link (if set for external participants), and the starting date/time. When the meeting time has started, the Enter Meeting Room button will be blue and active. NOTE: there are call-in numbers available for the moderator only. Students are not allowed to call in to the meetings.

When the starting time has not yet occurred, the Enter Meeting Room button is grayed out and inactive. However, a notice of when the room will open does appear above the button. This is true for all users, including moderators. However, participants (students) will get a message that says "Waiting for moderator to open the room" so they can't get in before you do.

Note: Firefox and Chrome are the recommended browsers for Virtual Classroom sessions. Safari can be used on iOS. It is also recommended that headphones are used to prevent echo.
Creating a Quicklink to Your Virtual Classroom
To create a quicklink to a virtual classroom session:
- On the course home page, click Content.
- In the module or sub-module where you want to add the quicklink, from the Existing Activities button, select Virtual Classrooms.
- Select the meeting that you want to add or click Create Meeting to schedule a new session.
Using Virtual Classroom
When your session begins, you'll first be asked how you want to join the audio.

Selecting Listen Only will let you in immediately and give you access to hear the meeting via speakers or headphones, but you cannot be heard. Selecting Microphone will bring up a permissions window where you will need to select Allow for your microphone to interact with the software.

After you select "Allow", you'll get another window that will provide an audio test to ensure that your microphone and speakers are working properly.
 >
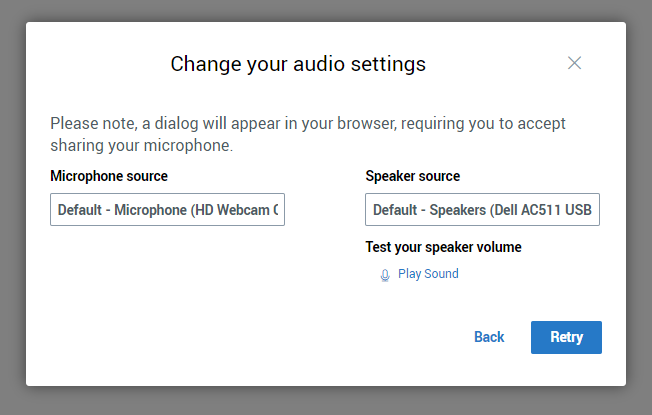
>If your audio does not function properly, you may select Audio Settings to be taken into the menu to confirm your microphone and speaker sources.

Note: Pay close attention for the browser permissions particularly when testing your mic and webcam
Once you have your audio settings in place and enter the room, you may see a quick-view tutorial showing you the different settings in the room. Click anywhere on the screen to dismiss this tutorial.
Camera/Screen Menu
At the bottom of the screen are options to mute your microphone, to leave the audio (i.e. to turn off your speakers), to share your web cam (if allowed as participant), and to share your screen (as presenter). NOTE: presenters will likely have to install an add-in to allow them to share their screen.

Connection/Recording Indicators
There is an internet connection speed indicator in the upper right corner. This green/yellow/red indicator lets you know whether or not you are connected to your Virtual Classroom session with sufficient speed to participate fully in the meeting. You can click on the circle to get more information about your connection. If you have a yellow or red indicator, you will likely experience issues like not being able to see or share webcams or desktop, as well as potential audio issues.

If your Virtual Classroom session was scheduled with recording enabled, you will see the word Recording next to the record icon at the top of the room screen.

If the start recording automatically option was checked, recording begins when you enter the classroom. However, clicking the record button will start recording manually. These recordings are saved in the Recorded section of your Meetings page.
Using Whiteboard and Annotation Tools
The Virtual Classroom space is pre-loaded with 10 pages of whiteboard space. (There is a URL at the bottom of the first whiteboard page for a webpage that has support and tutorials related to Virtual Classroom).

To navigate between pages in the presentation/whiteboard space, you can either use the left or right arrow buttons or skip directly to a specific page by selecting the slide number in the drop down menu.

Annotation Tools
The side toolbar has tools that can be used during the presentation. The first option is Tools. Click on it to expand to see the options under it. You have the text option that gives you the ability to change the size and color of the font. Other options are shapes, such as line, ellipse, triangle, rectangle and pencil. These tools also have size and color options available as well.


The second item is the Undo tool, which is self-explanatory - it allows you to undo the last action.

The third item is the Clear All tool, which is also self-explanatory - it allows you to undo all of the board actions.

The last item is the MultiUser tool. This tool, when checked, allows all of the participants the ability to interact with the presentation board at the same time.

Actions/Upload a Presentation
To add a file to use in the presentation space, click the Actions button in the bottom left corner of the Virtual Classroom space. Next, select Upload a presentation.

You can drag a file from your computer into the uploading window or click on browse for files to open a file selector. Files selected or dragged into the uploader will appear in a list of presentations.

The current file will be denoted in the presentation list. To change the presentation, select the button to the right of the file and click the Start button.

To navigate between uploaded files for use in the presentation space, click the Actions button and select Upload a presentation to return to the list of uploaded files. To return to the whiteboard function at any time, select the Actions button, then Upload a Presentation, and select the default.pdf file and click Start.
Actions/Taking a Poll of the Participants
To start a poll question, click the Actions button at the bottom of the screen and select Initiate a poll.

Choose the poll type from the menu that correlates with the type of question you will ask. Ask the poll question and allow time for participants to respond. The poll question can also be uploaded on a slide and displayed in the presentation window.

You can also create a custom poll type if needed. When Custom Poll… is selected, you will be prompted to enter polling choices. You may enter up to six answer choices for students to choose from. When finished, click Create.

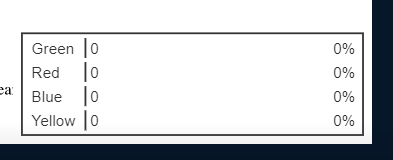
As soon as you click Create, the participants can start to answer the poll. You can Close Poll or Close Poll and Publish Results.

If you choose to publish the results, they will appear on the presentation screen for both you and the participants.

Participant Status and Settings
Participants can raise their hands or share status related to their understanding of the presentation by clicking their name in the participants list, and selecting the Set Status option.

This status will be displayed in the Participants list, in the circle icon to the left of the user’s name.

As the Instructor and moderator of the Virtual Classroom session, clicking on a participant’s name opens a popout menu. Here you are able to open a private chat, mute user, make presenter, promote to moderator, or remove the user from the session.

Instructors also have the ability to allow or disallow certain features within the Virtual Classroom space for students. To view which features can be restricted, click the vertical ellipses in the top right-hand corner of the screen and select Settings and then Participants.

You are able to lock students’ webcam, microphone, and ability to chat publicly and/or privately.
In Settings, there is also a Closed Captions option.

To activate the Closed Captions, set the button to On and set your font selections, if preferred. When finished, click Save to return to the main meeting space.
The Closed captions box will appear below the presentation window on both the moderator and participant screens. The moderator can identify the individual who will type the captions and advise that person to click the Take ownership button that appears below the captions box.
Note: Only one participant should take ownership of the stenographer role.
Leaving/Ending a Meeting
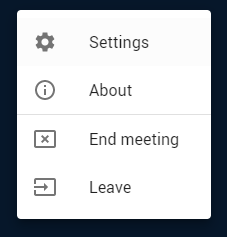
Once the meeting has concluded or if a participant needs to leave early, click on the vertical ellipses in the upper right corner and then select Leave or End Meeting to exit.
Meeting Recordings
If a meeting was recorded, once the recording has been processed, it will appear on the meetings page under Recorded Meetings. Click on the vertical ellipses and then Preview to watch the recorded meeting. You can also copy the URL, download, and/or delete the recordings as well. Recordings are stored for 14 days before they are removed from the system; however, you can download them to your own computer.


