Topics Map > Cobra Learning
Cobra Learning - Respondus 4.0

Respondus 4.0
Respondus 4.0 is an exam authoring tool that allows for the creation and management of exams. The exams can be printed to paper or published directly to Cobra Learning. If you have your exams in Cobra and need a print copy, you can export the exam FROM Cobra through Respondus to a Word file. If you have a Word file of questions and want them imported into Cobra, that is also easily done via Respondus.
Note: Respondus is accessible through the Apporto system. See Accessing Respondus 4.0 for details.
1) Importing Questions into Cobra Learning
Creating the Question File Using Word
Saving the Question File in Respondus
Publishing the Question File Using Respondus
2) Exporting a Quiz for Printing/Saving
Importing Questions into Cobra Learning
Creating the Question File Using Word or RTF
When creating your Word or text (RTF) file of questions, it is important to ensure that the formatting is done correctly.

Note: You cannot upload a Word document from a publisher file without reformatting it.
Proper formatting includes:
- Not using headers, titles, difficulty, chapters, etc.. (You can separate questions by difficulty, sections, chapters, etc. within Cobra).
- Numbering your questions using a parenthesis (i.e. 1) Question )
- Creating answer options using alphabetic characters followed by a period or parenthesis (i.e. a. answer or a) answer )
- Placing an asterisk (*) in front of the correct answer response.
Saving the Question File in Respondus
Once you have logged into the Apporto system, click on the Respondus 4.0 [FACULTY] icon located on the Apporto desktop. Click the Import Questions button on the Start page of Respondus.

In the Import Questions window, select your file type (Word document, text file). Browse to find your question file in your Apporto U:/ drive or OneDrive account. To create a new document to upload to Cobra, make sure the "Create a new document" radio button is selected and enter a name for the file. It can be the same as your question file (i.e. Chapter 1 Test).

Note: if you get any warnings or errors, you will need to refer back to your questions file to ensure that your formatting is correct. The warnings window will typically give you the information needed to fix the file.
If you have no warnings or errors in your file, click Finish.


Note: If you accidentally close Respondus and need to locate the file that you just saved, you can find it by going to your OneDrive library, select the Respondus Projects folder, and click on the folder with the name of your question file. If using Apporto, you will find the default file location is set to U:/Respondus Projects/, and can be accessed by the File Explorer.
Publishing the Question File Using Respondus
After saving your file, click the Preview & Publish tab in Respondus. Select the Publish option from the menu on the left. To start the publishing process, click the Publish Wizard button.

Select the type of publish you want. You have three options:

- Publish to a single course -- this process will log you into Cobra (once you have authenticated) and allow you to select the course in which to publish the file.
- Batch publish to multiple courses -- this process will log you into Cobra (once you have authenticated) and allow you to select the courses in which you want to publish the file.
- Export QTI XML for manual upload -- this process will create a zipped file that you will upload into Cobra manually. This file will be saved to your OneDrive account.
Publish / Batch Publish File to Course(s) in Cobra Learning:

Select the Publish to sing course or Batch Publish to multiple courses option. Cobra Learning should be the selected server. The correct settings should populate automatically when Cobra Learning is the selected server. Then click Next to connect to Cobra. NOTE: you may be asked to authenticate/log in to Cobra.
Once you have logged in, you can select the course or courses in which you want to upload the question/quiz file. Name the assessment as you want it to appear in Cobra and select the type (quiz, self assessment, question library). You have options for duplicate assessments in the course: 1) drop the assessment from that course (i.e. do not upload); 2) add the assessment but add a -2,etc. to the name to identify its duplication; or 3) replace the assessment with the same name in the course (cannot be done if students have already taken it).
It is recommend that you UNCHECK the additional options as these settings can be set on the quiz itself in Cobra. Click Next to publish the question file/quiz to the course(s).

Once the file has successfully been imported to the course(s), you will receive an End Batch Publish notification. Click Finish.

You can close Respondus now and log in to Cobra Learning. Check each of the courses in which the file was imported to ensure that the question file/quiz was uploaded. You may now go into the file to make the necessary changes and activate the file.

Manual Upload of Respondus File to Cobra Learning

Select the Export QTI XML option, and then click Next to prepare the file for download.
On the next screen, you will select your Assessment Type (quiz, self-assessment, question library) and uncheck the Assessment Options (these settings can be set in Cobra by the instructor and are not needed in this process). Choose a name for the file. The name of the file is what the quiz will be called in Cobra, which can later be changed but you might want to consider calling the file what you intend to name the assessment. Click Finish. 
Once you click Finish, you will be prompted to confirm the name of the file and select where you want to save it. We suggest saving it to your OneDrive account for ease of locating later. Click Save.


You can close Respondus and navigate to Cobra Learning.
Go to where you want to manually import your question/quiz file. Select Course Admin in the navigation bar. Then, select Import / Export / Copy Components.

Select Import Components and click Start.
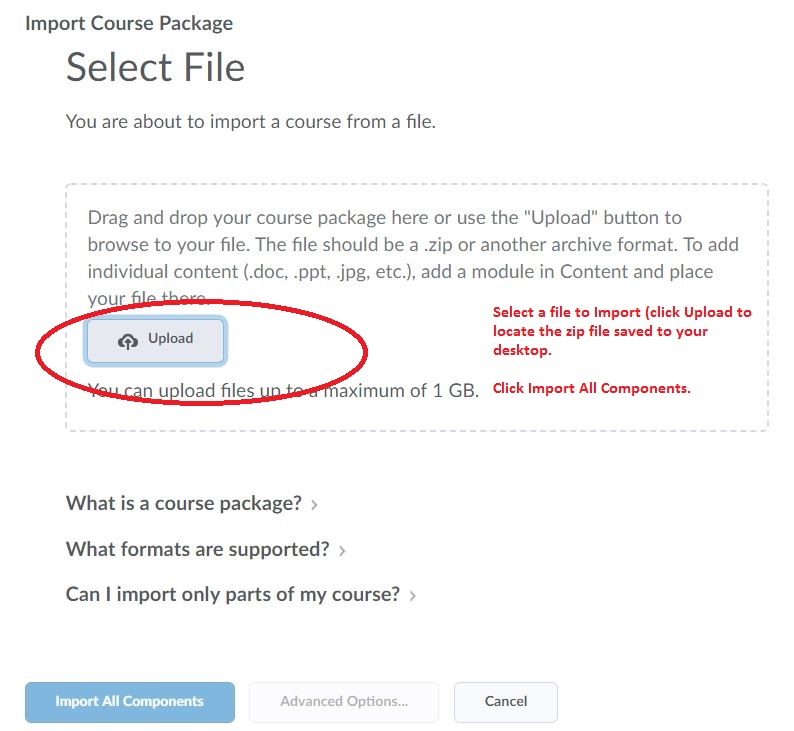
Click Upload and locate your zipped file (from your OneDrive account if you saved it there from the prior steps) and select it. Then click Import All Components to start the upload process.

The upload process window will track the progress of the import. Once it is complete, click View Content to be taken to the Content page of your course.

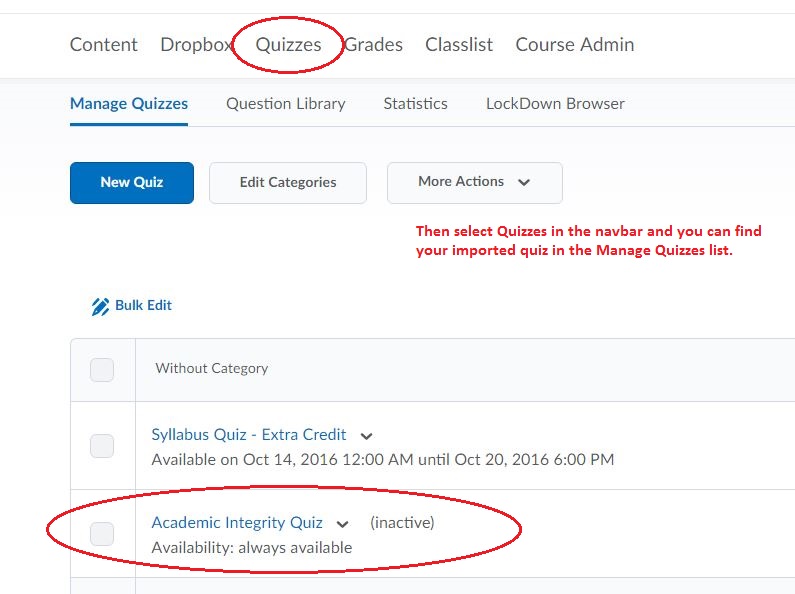
Click Quizzes in the navigation bar and confirm that the quiz was imported. You can now click on the quiz to manage the settings and activate the quiz.

Exporting a Quiz File from Respondus for Printing/Saving to File
Click on the Respondus 4.0 [FACULTY] icon located on the Non-GPU Desktop (through Apporto). Ensure that D2L Brightspace is selected next to "Current Personality".

Select the Retrieval tab at the top of the screen and click the Retrieve Questions button.

Ensure that the Cobra Learning (PSS) server is selected. The first time you use Respondus, you may need to locate and set this server up. The necessary settings will populate when the server is selected. Click Next
The first time you connect to the Cobra Learning server, it will require you to log in to Cobra.

Once connected to the Cobra server, you will need to select the course from the list available that contains the assessment you wish to retrieve. Then, select the assessment type (quiz, survey, self assessment, question library) and choose the corresponding assessment from the list. Next, enter a name for the file. 
Once you have made your selections, click Next.

A status window will show the progress and will let you know once it is complete.

Once it is complete, click Finish and you will be returned to the Respondus homepage.
If you accidentally close Respondus and need to locate the file that you just saved, you can find it by going to your OneDrive library, select the Respondus Projects folder, and click on the folder with the name of your question file. If using Apporto, you will find the default file location is set to U:/Respondus Projects/, and can be accessed through the File Explorer.
Next, click the Preview & Publish tab in Respondus. Select Print Options from the menu on the left. Select your format (Exam, Exam with Answer Key, or Answer Key only), enter headers if desired, and then select whether you want to randomize the questions or not. In addition, you can choose specific questions to be included, if desired (leaving option #4 blank includes all questions).
Finally, you can choose to Print Preview the file, Save to File (recommended), or Send to Printer.

Selecting Save to File prompts you to choose the file name and where you want to save it.

You'll receive confirmation that the file was saved.

Locate the saved file on your shared Apporto U:/ drive or OneDrive account and open it in Word to review and edit it.

The file is now ready to be printed for paper testing and/or saved to your computer for later review and usage.

